The Budgeting Process contains two programs:
- Scenarios: Allows for the creation of a budget scenario via spreadsheets which are then promoted to proposed amounts.
- Proposed Amounts: Once promoted, the budget and revenue amounts are displayed in the proposed amounts grid to allow for further changes. Once ready, they will be applied as adjusted budget and revenue estimates.
Scenarios
- Click on Budgeting → Scenario → Create to create a Scenario for your budget adjustments
- Enter Name → Description →
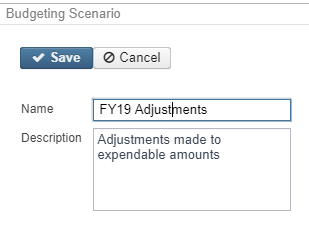
- Click Save to save the Scenario or continue on to create or upload sheets. Remember to ‘Save’ the scenario when finished
Create New Budgeting Spreadsheets within the scenario
Click on 'Create' to create a spreadsheet within the budgeting scenario
- Select Type (Budget or Revenue)
- On the 'Properties' tab, add or remove properties you would like on your spreadsheet.
- Click on 'Configure Filters' to filter accounts you want included on the spreadsheet (i.e only want accounts with OPU = 200)
- Enter a 'Sheet Name'
- Click on 'Save Sheet' to save your spreadsheet. A 'Confirmation Sheet Creation' box appears. Click on 'Create' to continue creating the spreadsheet. Once complete, an informational box appears stating the budgeting sheet created successfully.
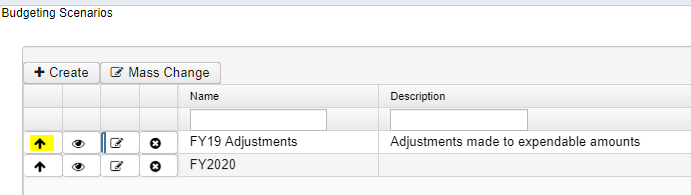
Scenario Grid
Once a spreadsheet is created in the scenario, it is displayed on the Budgeting Sheets grid. You can then access the spreadsheet using one or more of the following options in order to add adjusted amounts:

- Click on
 to edit an existing spreadsheet (must use the existing PA-XXXX column to enter your proposed amounts. If you are adjusting amounts for the current year (i.e. FY2019), your column header should display PA-2019)
- you can add (insert) or delete rows in your spreadsheet
- You can use formulas to enter your proposed amounts
- If you prefer to enter proposed amounts and/or make changes to your spreadsheet via Excel, click on
 to download the spreadsheet into Excel. Once the spreadsheet is completed and saved, click on
  to import the spreadsheet back into the scenario
 - Click on
 to delete an existing spreadsheet you no longer want.
Upload Budgeting Spreadsheets into the scenario
Use the Upload option to upload outside spreadsheets into your scenario. These spreadsheet may contain proposed amounts.
- Click Upload
- Enter a 'Sheet Name' and optional 'Description'
- Click on 'Choose File' and select the outside spreadsheet you want to upload
- NOTE: The outside spreadsheet must contain account code dimensions in separate columns with the proper column headers. You may also include the proposed amounts. The following rpd-json files may be downloaded and imported into the Redesign. They are similar to the SSDT Budget Expense and Revenue Expense template report definitions but have been formatted to include the proper columns headers in a spreadsheet format.
- NOTE: When entering proposed amounts, you must change the 'Next Year Proposed' column to 'PA-XXXX' (XXXX=desired fiscal year) in order for the spreadsheet to upload properly into the the budget scenario.
- Click on 'Start Upload' to upload the spreadsheet. Once complete, an informational box appears stating budgeting sheet was uploaded successfully.
Promote a Scenario
Once a scenario is completed, it can be "promoted" to the proposed amounts grids. Promote includes all spreadsheets in the scenario. Once promoted, the accounts with associated amounts will appear in Budgeting/Proposed Amounts Grid.
Please note that once a scenario is promoted for a specified fiscal year, any successive scenario related to the same fiscal year that is promoted will remove the prior scenario's proposed amounts on the grid. For example, you create a scenario for HS adjusted amounts for FY2019 and promote it. You then promote another scenario containing Elementary adjusted amounts for FY2019. The HS adjusted amounts will be removed and the elementary amounts will be uploaded. Instead, we recommend once the HS amounts adjusted amounts are complete, to apply those amounts. The user can then proceed with promoting the Elementary amounts to the proposed amounts grid, which will then clear out the HS amounts (which are no longer needed).
Proposed Amounts

Contains separate tabs for existing 'Proposed Budgets' and 'Proposed Anticipated Revenues' amounts in a grid format based on the fiscal year selected. Users can:
- Create a proposed amount in order to add it to the existing grid
- Enter or search for an account
- Enter a fiscal year
- Enter an proposed amount
- Click on 'Save'
- View a proposed amount
- From the grid, search the desired account and click on
 to view the details of the proposed amount.
- From the grid, search the desired account and click on
- Edit a proposed amount
- From the grid, search the desired account and click on
 to edit the fiscal year or proposed amount.
- From the grid, search the desired account and click on
- Delete a proposed amount
- Per account: From the grid, search the desired account and click on
 to delete the proposed amount for that account. Click on 'delete' to confirm deletion.
 - Mass Delete: From the grid, click on the checkbox for the proposed amounts you want to delete and click on the
 button to mass delete all checked accounts.
- Per account: From the grid, search the desired account and click on
Applying Proposed Amounts
Once all of the adjusted amounts have been entered for a fiscal year, click 'Apply' to apply them.
NOTE: You cannot choose specific accounts to apply amounts to. It will apply the amounts to all accounts on your proposed amounts grid.

Choose 'Adjustment' which will adjust the existing expendable amounts via additions/deductions. The initial figures are not touched. The 'Update the GAAP Original Estimate' amounts box defaults to being checked but you have the option to uncheck it.
- Effective Date: automatically defaults to the first day of the fiscal year selected when selecting temporary or permanent transaction types. When selecting Adjustment transactions type, you have the option of entering an effective date. The adjustment will not become effective until you are in that processing period.
Click on 'Apply' to proceed with applying the adjusted figures.