Vendors
- Former user (Deleted)
- Amanda Folkman
- Former user (Deleted)
Vendor
A vendor is a person or company that the entity is purchasing goods or services from. The vendor record contains basic biographical information as well as 1099 and New Hire reporting information. The 1099 fields are based on the IRS guidelines. The New Hire Reporting flags are used for vendors that need to be reported to the Ohio Department of Job and Family Services.
The vendor number will be automatically assigned to the next available number on file unless you override the auto assign by entering a desired vendor number.
Check name and address location are used if payment should be sent to a different name/location than the purchasing information.
Create
- From the Core menu select 'Vendor'
- Click on

Enter in desired information for the vendor
Vendor primary name and number are required. The number will be automatically assigned for you unless you enter in a vendor number.
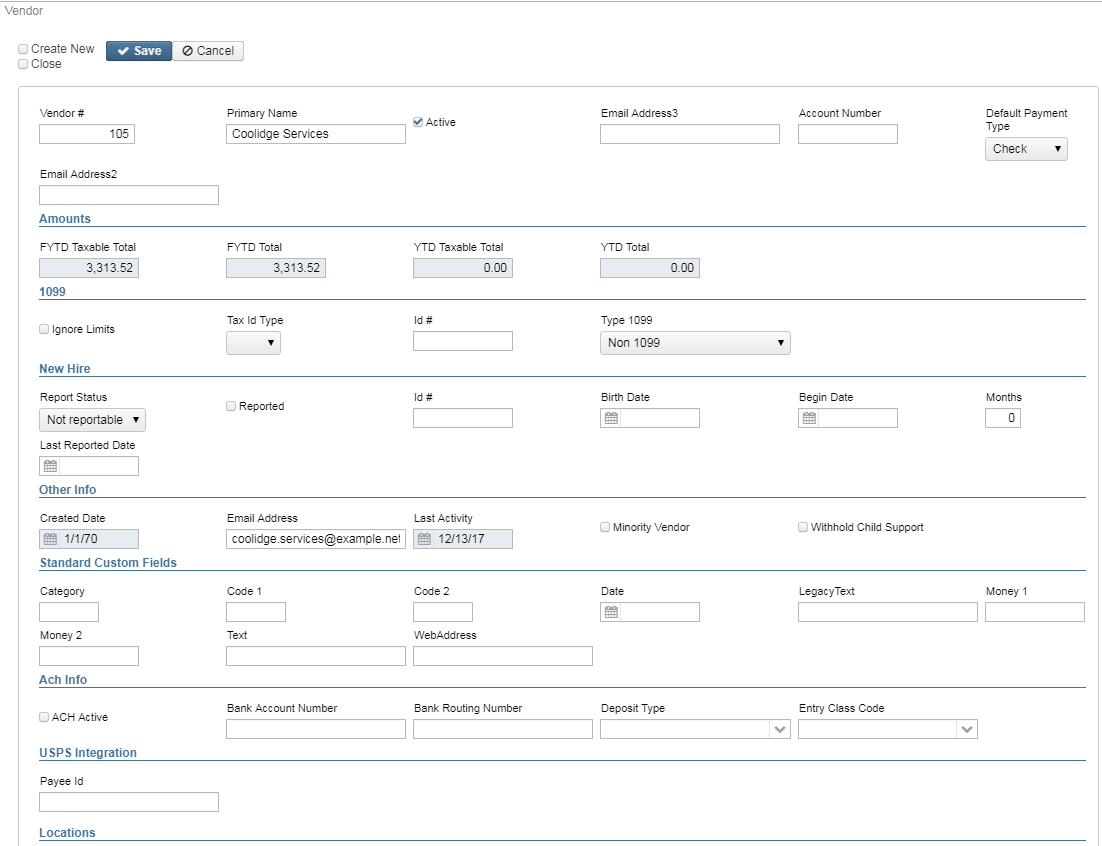
Default Payment Type options include:
- Check: used for disbursements where a physical check is required.
- Electronic: used for memo-type disbursements. Memo Vendor numbers from 900000-999999 are no longer used in the redesign. A memo vendor is designated by selecting the default payment type of 'Electronic'.
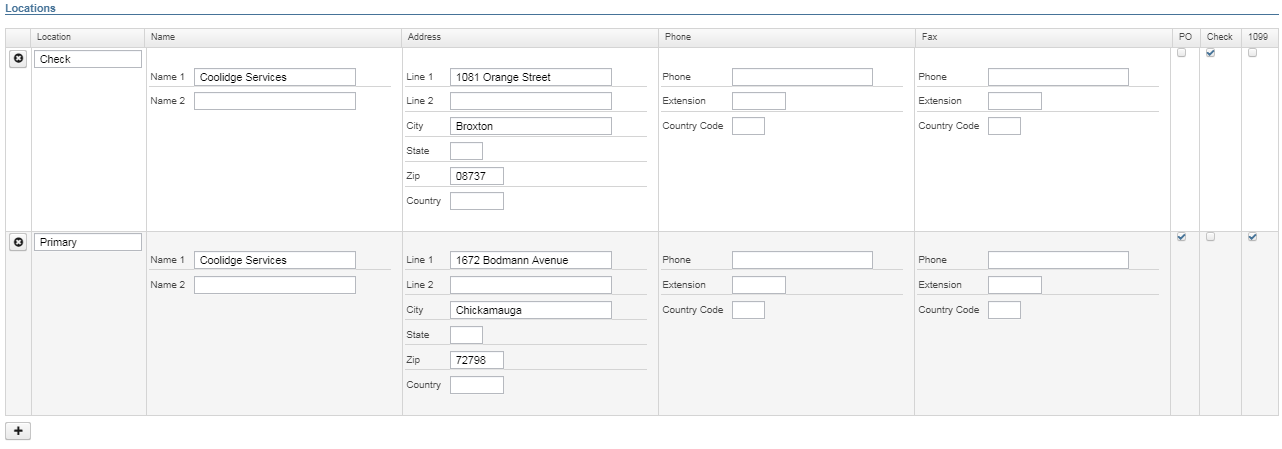
Separate Locations can be added if the vendor has separate purchase order, check and 1099 addresses.
- Enter a label for each type of location (i.e. Purchase Order for the PO Address). If you do not enter a label, the location name will default to 'Primary'.
- Enter the desired information for the location and check mark the appropriate box
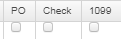
- For example: If you vendor's Purchase Order and Check Address locations are the same, you only need to enter one location (leave the location box blank and it wil default to 'Primary') and checkmark both the PO and Check boxes.
- If the 'Name 1' field is left blank, it will default to the name in the "Primary Name' field.
4. Click on  to post the vendor to the system, click on Cancel to not post the vendor and return to the Vendor grid.
Search/View Vendors
Vendor Grid allows the user to search for existing vendors. Click on  to view a particular vendor. The vendor grid also allows you to sort vendor information by typing specifics within the Column Title blank fields or selecting a Column Title to sort all vendors in ascending/descending order for example.
Edit Vendors
Only fields that are allowed to be edited will be displayed.
- Search desired vendor on grid
- Click on
 to edit the vendor
 - Make desired changes
- Click on
 to save desired changes to vendor, click on
  to not posted changes and return to the Vendor grid.
Vendor Adjustments
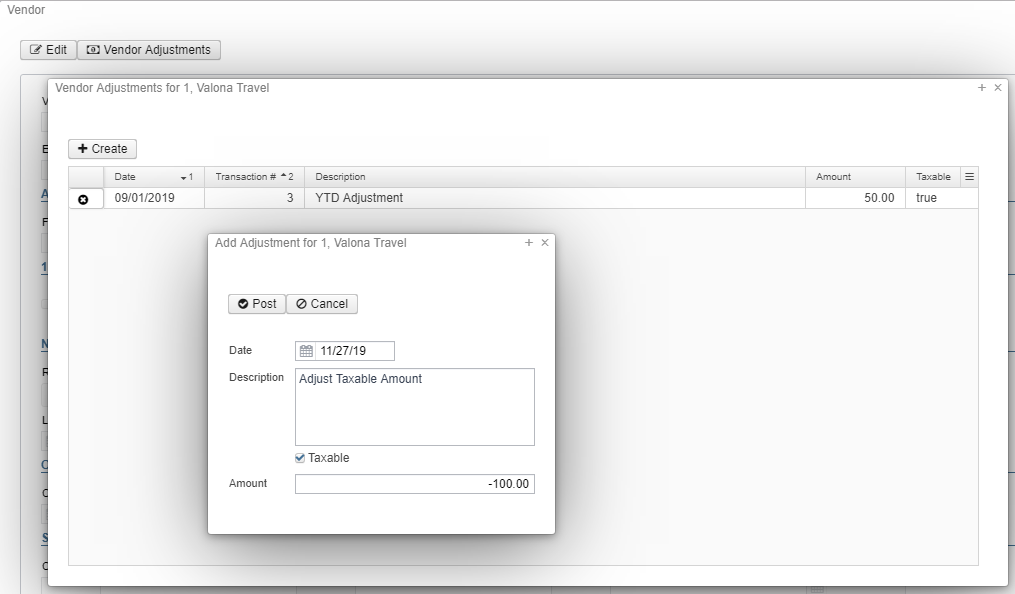
When viewing a vendor, you have the option of editing the Vendor FYTD and YTD amounts via the ![]() option. This option may be useful in making adjustments to the amounts reported for 1099 purposes or for startup districts with no classic USAS data to import.
option. This option may be useful in making adjustments to the amounts reported for 1099 purposes or for startup districts with no classic USAS data to import.
- View a vendor
- Click on Vendor Adjustments to open the Vendor Adjustments grid.
- Click on Create to create an adjustment:
- Date: The date will default to the current date.
- Description: You can optionally enter a description for the vendor transaction
- By default, taxable will be checkmarked. When checked, both the FYTD Taxable Total and FYTD Total as well as the YTD Taxable Total and YTD Total amounts will be updated. The 1099 program will use the amount from the YTD Taxable Total.
- Amount: the amount of the vendor adjustment. The amount entered can be positive or negative to increase or reduce the current YTD totals. This field cannot be blank or $0.00. This field cannot contain special characters ($) or commas.
- Click on Post to post the transaction and it will be displayed on the Vendor Adjustment grid.
Merge Vendors
When viewing a Vendor, qualifying vendors will have the Merged Vendor button available. This button will only be available for vendors that are eligible to be merged or vendors that have already had other vendors merged into it. A vendor is eligible to be merged if it is active and there are other vendors that have the same Tax ID Type, Tax ID#, and Type 1099. If there are no other vendors with this information it is not eligible to be merged and therefore the Merged Vendors button will be greyed out.

- View an active vendor
- Click on Merged Vendors
 to open the Merged Vendors grid.
 - Click on Merge Vendor
 to initiate a new merge:
 - Effective Calendar Year: When merged, any existing transactions for the old vendor in the selected calendar year only will be changed.
- The current calendar year will display by default. Any future years that have been created will also be available to select.
- Vendors: Select one or more vendors to be included in the merge using the checkbox in the first column.

- Only vendors that are eligible to be merged into this vendor will appear in this grid. This list can be filtered by number or primary name.
- For a vendor to be eligible for merge, the selected vendors are required to have the same values for the following fields:
- Tax ID Type
- ID #
- Type 1099
- Effective Calendar Year: When merged, any existing transactions for the old vendor in the selected calendar year only will be changed.
- Click on Merge to merge the selected vendors into the originating vendor. The selected vendors will be made inactive and marked as Merged.
- The vendor(s) being merged will no longer be active and the associated transactions beginning with calendar year selected will now be linked to the primary vendor.

- An output report will generate showing any transactions that will be updated to the new vendor as a result of the merge. A copy of this report is automatically sent to the Calendar Year section of the File Archive.

- The vendor(s) being merged will no longer be active and the associated transactions beginning with calendar year selected will now be linked to the primary vendor.
Merged Vendor List
Once vendors have been merged, the list of "old" vendors that were merged into the vendor being viewed will show in the Merged Vendor grid. This grid will show the Vendor Name, Number, Calendar Year of the change, and the date the Merge was performed. In order to regenerate a report of the transactions updated in the merge, click the print icon ![]() on the row to generate a report for any one merged vendor. To print a report for more than one merged vendor, use the checkbox in the first column to select vendors then click the Print button
on the row to generate a report for any one merged vendor. To print a report for more than one merged vendor, use the checkbox in the first column to select vendors then click the Print button  at the top of the grid. To close the Merged Vendor pop up window, click the Close button
  at the top.

Vendor Updates
When a Vendor Merge is performed, the following changes directly impact the Core > Vendor Records of the new vendor (will be used going forward) and old vendor (that was merged).
Updates to the New Vendor
- Any transactions for the Calendar Year chosen in the Merge for the vendor(s) selected in the merge will be updated to be associated with the new vendor. Any amounts associated with updated disbursements will be included in the YTD Total(s) on the new vendor. See Transaction Updates section below for further details on transaction specific updates.
Updates to the Merged Vendor(s)
- Vendors that have been merged into another vendor will be made inactive and marked as merged. Once a vendor has been merged into a new vendor, the Vendor Number, Primary Name, Active checkbox, and Merge Info cannot be manually modified.
- The Merge Info section near the bottom of the vendor page will show if the vendor has been merged into a new vendor. This will show the vendor it was merged into and the year it was merged. These fields are available to add to the Vendor grid via the "More" option or to use on Vendor based reports.
- Merged: If checked, the vendor was merged into another vendor.
- Merged Into: If the vendor being viewed was merged, this will show the vendor it was merged into that can be used going forward.
- Merged Year: The calendar year the vendor was merged. Any transactions for this calendar year that existed before the merge was initiated would now be associated with the "Merged Into" vendor.

Transaction Updates
If there were any outstanding transactions associated with the vendor that was merged, those transactions can still be processed. Transactions that were updated due to a merge will show both the new vendor and the original vendor.

The Original Vendor field will be populated on qualifying transactions for the following transaction types:
- Requisition
- Purchase Order
- AP Invoice
- Disbursement
- Refund
- Billing
- Payment
Invoices
If there were any invoices that had been processed but not yet paid, those will show on the Payable grid as highlighted.
Accounts Receivable
If the vendors involved in the merge have associated Accounts Receivable records, the Billings and Payments will be updated to include the Customer (new vendor) and the Original Customer (merged vendor) on the transaction. Any updated Billing and Payment transactions will show on the Merged Vendor Transactions report. The Customer associated with the merged vendor will be made inactive.

Un-Merge Vendor
After a vendor has been merged, the option to Un-Merge Vendor will become available. When a vendor is unmerged, any transactions previously updated to the new vendor will be changed back to the original vendor. This will only apply for the transactions originally changed. The vendor's merge flag will be cleared and the vendor will be made Active. In order to view a list of qualifying transactions, use the print option from the Merge List prior to using the unmerge option.
- View an active vendor
- Click on Merged Vendors to open the Merged Vendors grid.
- On the Merged Vendors List, locate the vendor that should be unmerged.
- Prior to unmerging, use the print icon
 to generate a list of transactions that were updated during the merge. These transactions will be unmerged.
 - Use the checkbox to select the vendor to be unmerged

- Click Un-Merge Vendor

- Review the information in the pop up and click Yes to proceed

File Archive
When a Vendor Merge is performed, the Merge Vendor Transactions report showing the results of the merge will be sent to the File Archive. These reports will show in the Calendar Year Reports Archive tab for the Calendar Year associated with the "Effective Calendar Year" chosen when the merge is performed. These reports will contain the date of the merge in the file name as well as a timestamp field.

Delete Vendors
It is not recommended to delete old vendors since this might destroy an audit trail. If the vendor number is re-used, reports from prior fiscal years will not match current vendor information. We recommend changing the status from "active" to "inactive" instead. Vendors will only be able to be deleted if they are not used on any transactions currently in the database.
- Search desired vendor to delete
- Click on
 to delete the vendor.
 - Click on "delete" to confirm deletion.
Import Vendors
The Vendor Import option may be used to import new vendors, modify existing vendors, or import vendor adjustments using a spreadsheet (CSV format). See the Import Criteria sections below for the required headers and CSV templates.
- From the Core menu select "Vendor."
- To import a CSV file, click on
 .
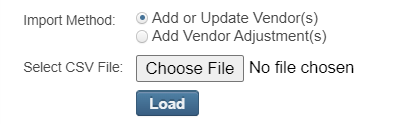
. - Choose the import method
- Add or Update Vendors - General Vendor information
- Add Vendor Adjustments - Impacts YTD amounts
- Click on "Choose File", browse for the file (.CSV) and click "Open" or select the file by double-clicking on the file name.
- Make sure the system has brought in the proper file.
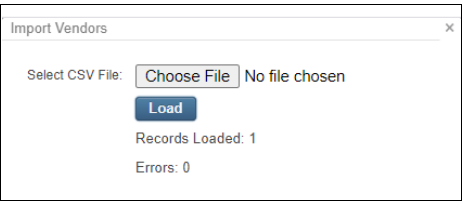
- Click on "Load."
- The selected filename will be visible.
- A message box will appear showing the number of Records Loaded and the Number of Errors.
- An output (CSV) file will be created containing the number of records loaded or records with errors.
- If an error occurs, open the output CSV file, make the necessary corrections, and re-import the corrected output file.
Add or Update Vendor Criteria
Please use the template spreadsheet containing the fields in the proper format (listed in the table below). If you are not using the template spreadsheet and are creating a spreadsheet of your own, the field names on the spreadsheet must exactly match the Field names listed below. The field names are case sensitive and must be entered exactly as shown below making sure to include the spaces between words. Please note, the fields specified below as "Required field" are the only fields that must appear in the spreadsheet. All other fields are optional.
Locations
When using the Location fields, only one location is allowed per row on the CSV. If importing multiple locations for a vendor, the additional locations need to be on subsequent rows of the CSV with the vendor's required fields populated as well.
Field | Format | Definition |
|---|---|---|
| Vendor # | An integer with a maximum of 8 digits. | Required field if modifying/updating an existing Vendor. When adding a new vendor, enter Vendor # or if left blank, the system will auto assign. |
| Primary Name | Maximum length is 15 characters. | Required field when adding/modifying a vendor. Vendor's primary name. |
Account Number | Maximum length is 15 characters. | The Vendor's account number. |
| Active |
| Required field only when changing vendor's Active/Inactive status. |
| Default Payment Type |
| Identifies the default payment type for the vendor. This is case sensitive and should be entered as shown. |
| Ignore Limits |
| Indicates if vendor should ignore the 1099 limits. |
| Tax ID Type |
| Identifies the Tax ID Type for vendor. If this field is populated the Tax ID# is required. |
| Id # | Numeric without dashes | The vendor's SSN or EIN number. |
| Type1099 |
| Indicates the 1099 type for vendor. This is case sensitive and should be entered as shown. |
| Birth Date | Acceptable formats as used in UI can utilize '/' slashes or '-' hyphens or numbers only (no delimiter).
| The vendor's birth date for New Hire reporting. |
| Begin Date | Acceptable formats as used in UI can utilize '/' slashes or '-' hyphens or numbers only (no delimiter).
| The vendor's beginning date for New Hire reporting. |
| Months | Numeric up to 2 digits. | The number of months the vendor's work is to be performed. |
| Email Address | Character string | The Vendor's email address. |
| Last Activity Date | n/a | Date of Last transaction activity on the vendor. This field is non-modifiable and should not be included in a vendor import. |
| Minority Vendor |
| Identifies if the vendor is a minority vendor. |
| Withhold Child Support |
| Indicates if the vendor should have child support payments withheld. |
ACH Active |
| If the ACHProcessing module is installed (using the System>Modules menu option), the ACH Active field can be added or updated on the vendor's record. |
| Bank Account Number | Numeric and Alpha | Indicates the Vendor's bank account number. |
| Bank Routing Number | Numeric | Indicates the Vendor's bank routing number. |
| Deposit Type |
| Identifies the deposit type for the vendor.
|
| Entry Class Code |
| Identifies if the Entry Class Code is PPD for Prearranged Payment and Deposit Entry or CCD for Corporate Credit or Debit. This is case sensitive and should be entered as shown. |
| Location | Text | Required field if the Location for a vendor is to be added/updated. This field is user defined to help Identify different Locations (addresses) for different situations. For example, the vendor may have a location for a PO address and location for a check address. (examples: Primary, Check Address, PO ) |
| Name1 | Maximum length is 16 characters. | Identifies the vendor's name to be used for specified location. |
| Name2 | Maximum length is 16 characters. | Identifies a 2nd vendor name field to be used for specified location. |
| Line1 | Numeric and Text | Identifies street address for vendor's specified location. |
| Line2 | Numeric and Text | Allows for a second address line for the vendor's specified location |
| City | Text | Identifies the City for the vendor's specified location. |
| State | Two character State abbreviation | Identifies the State for the vendor's specified location. |
| Zip | Numeric | Identifies the Zip Code for the vendor's specified location. |
| Country | Text | Identifies the Country for the vendor's specified location. |
| Phone | Numeric | Identifies the Phone number for the vendor. |
| Extension | Numeric | Identifies the Phone extension number for the vendor. |
| Country Code | Numeric | Identifies the Phone country code. |
| 1099 |
| Identifies if Location entered is the 1099 address to be used. |
| Check |
| Identifies if Location entered is the Check address to be used. |
| PO |
| Identifies if Location entered is the PO address to be used. |
Add Vendor Adjustments Criteria
Please use the template spreadsheet containing the fields in the proper format (listed in the table below). If you are not using the template spreadsheet and are creating a spreadsheet of your own, the field names on the spreadsheet must exactly match the Field names listed below. The field names are case sensitive and must be entered exactly as shown below making sure to include the spaces between words. Please note, the fields specified below as "Required field" are the only fields that must appear in the spreadsheet. All other fields are optional.
| Field | Format | Definition |
|---|---|---|
Vendor # | An integer with a maximum of 8 digits. | Required field Must match an existing vendor number. |
| Date | Acceptable formats as used in UI can utilize '/' slashes or '-' hyphens or numbers only (no delimiter).
| Required field Date to post the vendor adjustment as of. This date will be used to determine which Month and Year totals the adjustment impacts. |
| Description | Character String | Description that will show on Vendor Adjustment grid for this entry |
| Taxable |
| Determines if this entry will impact the Taxable totals that are used for 1099 amounts. If this column is left blank or not included, the default valued is True. |
| Amount | Must be a number. Cannot use $ or commas. | Required field Amount for this vendor adjustment. |
More Information on Vendor
ACH Fields
If the ACH Processing module is installed (using the System>Modules menu option), then a set of ACH fields will also be available for the vendor. USAS does not currently support the creation of ACH files so ACH Active flag is not currently used, but the other ACH fields may be used with third-party vendor software that support vendor ACH submission. For more information on utilizing these fields for third-party ACH file creation please see the Vendor section of the FAQ wiki page.
Vendor New Hire Fields
The Reportable Status for vendors can be manually set to Reportable or Not Reportable when adding the vendor. For Vendors that are set to Reportable, the "Reported" check box and "Last Reported Date" will be updated when the vendor exceeds $2,500.00 for the year and is included on the Vendor New Hire Report (run as actual). When the Posting Period is changed from December to January of the next calendar year, the Reportable check box will automatically show as cleared (not reported) for the new year.
Changing Vendor Numbers
By default, the system does not allow you to change vendor numbers. However, this is controlled by an optional rule which can be disabled or customized to be a warning instead of a fatal error. This rule can be found in the System>Rules option with the name org.ssdt_ohio.usas.model.vendor.VendorNumberChanged.
Tracking Vendor Numbers
In SYSTEM/Configuration, the Transaction Configuration option allows the district to track the highest transaction number instead of the system using the highest number retrieved from the database. Please click here for more details.
Multi-Vendors from Classic
Since requisitions and purchase orders can be posted without a vendor in the redesign, the use of multi-vendor vendor numbers is no longer needed in the Redesign. When importing Classic's multi-vendor vendors, they will be automatically set to inactive. Custom fields can be used to track requisitions/purchase orders paid to multiple vendors.
Taxpayer ID Rules
By default, the TIN Type field must be set to SSN or EIN if the Taxpayer ID is entered and the vendor is flagged with a 1099 type. However, this is controlled by an optional rule which can be disabled or customized to be a warning instead of a fatal error. This rule can be found in the System>Rules option with the name org.ssdt_ohio.usas.model.vendor.VendorTaxIdRules.
USPS Integration Payee id
This allows the user to link the payee id from the USPS pending transaction to the USAS vendor. If the pending transaction does not contain a payee id, a USAS vendor can still be selected to apply to the transaction being posted as a result of accepting the pending transaction.
US Territory Codes
In addition to all 50 US states, codes for the following US Territories can be used when entering the vendor location.
- (AS) American Samoa: Manua Island, Swain’s Island, Tutuila Island
- (GU) Guam
- (PR) Puerto Rico
- (VI) U.S. Virgin Islands: St. Croix Island, St. John Island, St. Thomas Island
- (FM) Micronesia: Chuuk (Truk) Island, Kosrae Island, Pohnpei Island, Yap Island
- (MH) Marshall Islands: Ebeye Island, Kwajalein Island, Majuro Island
- (MP) Northern Mariana Islands, Commonwealth of the: Rota Island, Saipan Island, Tinian Island
- (PW) Palau: Koror Island